Hello fellow yarn lovers! Get ready to fall head over heels for the most adorable crochet pumpkin pattern you’ve ever seen – and guess what? It’s completely FREE!
Imagine a plump, perfectly round pumpkin, bursting with cozy autumnal vibes, complete with a cute little stem. Whether you’re looking to add a touch of handmade charm to your home decor, create the sweetest gifts for loved ones, or simply flex your crochet muscles, this project is an absolute dream. It’s wonderfully beginner-friendly, making it the perfect opportunity to dive into a new project with confidence.
In this tutorial, we’ll guide you through each step with clear instructions and even a helpful video to ensure your pumpkin turns out absolutely picture-perfect. Let’s get hooking and bring some seasonal joy into your life!
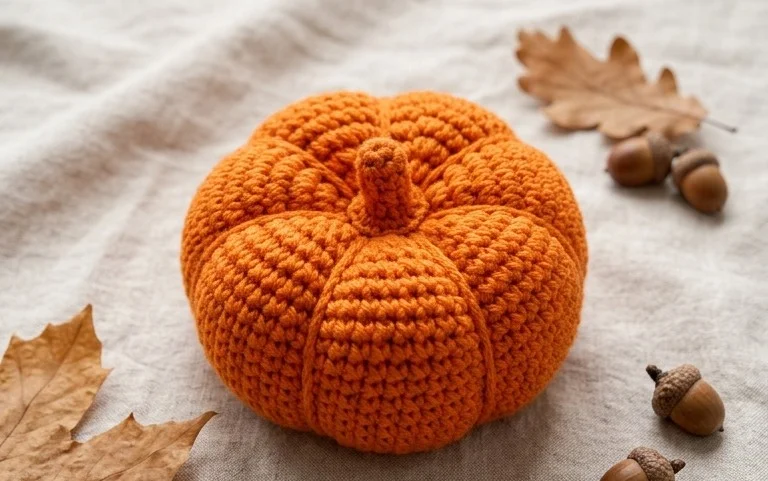
Embrace the Cozy: Crafting the Cutest Crochet Pumpkin (Tutorial + Video!)
There’s a certain magic in the air when autumn rolls around, and for us crafters, that magic often translates into yarn and hooks! What better way to embrace the season than by creating your very own adorably plump crochet pumpkin? This free pattern is designed to be a delightful and accessible project, perfect for both seasoned crocheters looking for a quick autumnal delight and beginners eager to dip their toes into the wonderful world of amigurumi. Get ready to fill your home with handmade warmth and charm!
Your Pumpkin Patch Essentials: Yarn and Hook Recommendations
Choosing the right yarn and hook is key to achieving that perfect pumpkin look. For this project, we’re aiming for a wonderfully squishy and huggable pumpkin, so a medium-weight yarn, often labeled as worsted weight (category 4), is your ideal companion.
Yarn Type: Acrylic yarn is a fantastic choice for this pattern. It’s durable, readily available in a vast array of autumnal colors, and easy to care for – perfect for those little hands that might want to snuggle with your finished pumpkin. You can also explore wool blends for a more luxurious feel or cotton for a firmer, more structured pumpkin.
Color Choices: The obvious choice is a classic pumpkin orange, but don’t be afraid to get creative! Think about deep burgundies, warm yellows, even earthy browns for a more natural look. For the stem, a nice chocolate brown or a mossy green works beautifully.
Hook Size: The hook size will depend on your yarn choice and your personal tension. Generally, for worsted weight yarn, a hook size between 4.5mm (US 7) and 5.5mm (US I/9) is recommended. The pattern will likely call for a size that gives you a nice, firm fabric without large gaps. It’s always a good idea to make a small swatch with your chosen yarn and hook to see if you like the density of your stitches. If your fabric feels too loose, try a smaller hook; if it’s too stiff, go up a hook size.
Mastering the Stitches: Your Crochet Toolkit
This pumpkin pattern primarily relies on a few fundamental crochet stitches that are staples for any amigurumi maker. Even if you’re new to these, don’t worry! The accompanying video tutorial will guide you through each step with clarity and patience.
Magic Ring (or Magic Circle): This is the secret to creating a seamless, tight circle at the beginning of your project. It allows you to pull the yarn tight, eliminating any small hole in the center.
Single Crochet (sc): This is the workhorse of amigurumi. It creates a dense fabric that’s perfect for stuffed items. You’ll be working in continuous rounds, meaning you won’t be joining at the end of each round with a slip stitch. Instead, you’ll use a stitch marker to keep track of your starting point.
Increases (inc): To make your pumpkin grow in size, you’ll be working two single crochet stitches into the same stitch. This is how you create the round shape.
Decreases (dec): To shape the pumpkin and close it off, you’ll be working a “single crochet 2 together” (sc2tog) stitch. This is done by working into the front loops of two stitches, pulling up a loop, and then completing the single crochet stitch as one. This reduces the number of stitches.
Slip Stitch (sl st): Used primarily to join rounds (if you choose to do so) or to create a neat finish.
Tips for the Novice Pumpkin Maker
Embarking on your first amigurumi project can feel a little daunting, but this pumpkin pattern is incredibly beginner-friendly. Here are a few tips to make your crafting journey even smoother:
Watch the Video! Seriously, this is your best friend. Seeing the stitches worked in real-time makes a huge difference, especially for techniques like the magic ring and decreases. Pause, rewind, and rewatch as many times as you need!
Use a Stitch Marker: As mentioned, amigurumi is usually worked in continuous rounds. A stitch marker placed in the first stitch of each round will prevent you from getting lost and ensure your pumpkin has a consistent shape.
Stuff as You Go: Don’t wait until the very end to stuff your pumpkin! As you crochet each round, add a little bit of stuffing. This makes it easier to evenly distribute the filling and prevents you from stretching out your stitches when trying to force stuffing into a small opening.
Count Your Stitches: It’s easy to miss a stitch or accidentally work an extra one. Take a moment at the end of each round to count your stitches and compare it to the number indicated in the pattern. This will save you a lot of frustration later!
Don’t Be Afraid to Frog (Unravel): If you notice a mistake early on, it’s often easier to simply pull out your stitches (frog) and start that round again. It’s all part of the learning process!
Personalize Your Pumpkin Patch: Customization Ideas
The beauty of handmade is the ability to make it uniquely yours! This crochet pumpkin pattern is a fantastic canvas for your creativity.
Color Play:
Ombre Effect: Use multiple shades of orange, starting with a lighter hue and gradually transitioning to a darker one as you crochet.
Striped Pumpkin: Alternate colors every few rounds for a fun, playful look.
Two-Tone: Crochet the main body in one color and then add a contrasting color for the top few rounds.
Gauzy Effect: If you’re feeling adventurous, try using a slightly larger hook and a lighter yarn to create a more open, lace-like pumpkin that you can hang as a decoration.
Size Matters: The Magic of Gauge
The size of your finished pumpkin is primarily determined by your yarn and hook combination, and your personal tension.
Larger Pumpkins: To create a bigger pumpkin, use a thicker yarn (like bulky weight) and a larger hook. Conversely, if you stick with the recommended yarn but simply use a larger hook size, you’ll achieve a larger pumpkin with a slightly more open stitch pattern.
Smaller Pumpkins: For miniature pumpkins perfect for a tiered tray or garlands, opt for a finer yarn (like sport weight or DK weight) and a smaller hook. You can even use embroidery floss for tiny little decorative pumpkins.
Stem Variations:
Twisted Stem: Crochet a small rectangle, fold it in half, and seam it to create a thicker, twisted stem.
Curled Stem: Create a small chain and then crochet a few rows of single crochet to create a flexible, naturally curling stem.
Leafy Stem: Add a small crocheted leaf or two to the base of the stem for an extra touch of nature.
Caring for Your Crochet Creation
Your adorable crochet pumpkin is designed to be enjoyed for seasons to come. Here’s how to keep it looking its best:
Washing: For acrylic yarns, gentle machine washing on a cool or warm cycle is usually safe. Place your pumpkin in a mesh laundry bag to prevent it from getting snagged. Hand washing in cool water with a mild detergent is always the gentlest option.
Drying: Never put your crochet items in a machine dryer! The heat can melt acrylic fibers and cause your pumpkin to lose its shape. Instead, gently squeeze out excess water (don’t wring!) and lay it flat on a clean towel to air dry. Reshape it as it dries.
Fluffing: Over time, your pumpkin might get a little squished. To revive its plumpness, simply give it a gentle squeeze and reshape it. For a more thorough fluffing, you can carefully remove some of the stuffing and re-stuff it.
Beyond the Pumpkin Patch: Project Ideas
This cute crochet pumpkin pattern is incredibly versatile! Once you’ve mastered the basic pumpkin, the possibilities are endless:
Seasonal Decor: Make a whole batch in various sizes and colors to adorn your mantelpiece, shelves, coffee tables, or windowsills.
Gift Giving: A handmade pumpkin is a thoughtful and cherished gift for friends, family, or teachers during the autumn months.
Halloween Fun: Use spooky colors like black and purple, or add some googly eyes for a playful Halloween decoration.
Thanksgiving Centerpiece: Create a collection of pumpkins in rich autumnal hues to form a stunning Thanksgiving centerpiece.
Amigurumi Friends: Combine your pumpkin with other amigurumi patterns to create a whimsical autumn-themed scene. Imagine a crochet squirrel or a little crocheted owl perched next to your pumpkin!
Garlands and Wreaths: String smaller pumpkins together to create charming garlands or attach them to a wreath form for a festive door decoration.
Placeholders: Smaller versions can even double as cute place card holders for your Thanksgiving table.
So grab your yarn, hook up that magic ring, and get ready to crochet your way into the cozy spirit of autumn. This Cutest Crochet Pumpkin pattern is more than just a craft project; it’s an invitation to create something beautiful, heartfelt, and wonderfully autumnal. Happy crocheting!
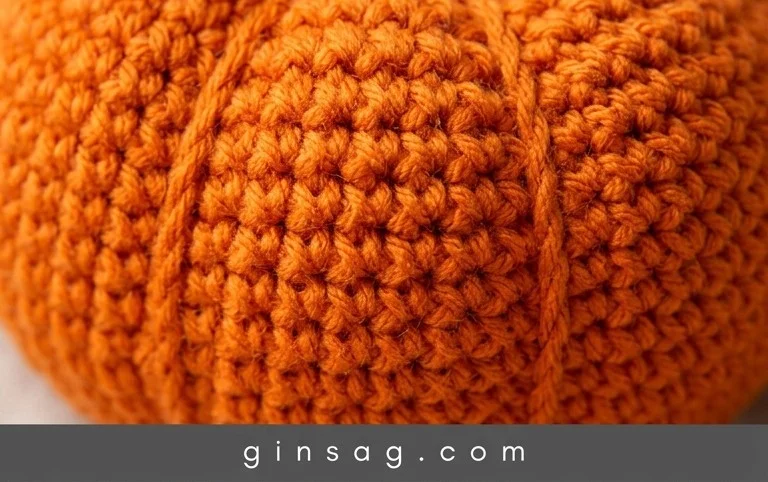
And there you have it – your very own adorable crochet pumpkin, ready to bring a touch of handmade charm to your autumn decor! We truly hope you’ve enjoyed this free pattern and found it a delightful project. Don’t hesitate to give it a try; the results are sure to be wonderfully rewarding!
Once your pumpkin is complete, we’d absolutely love to see it! Share your finished projects on social media and tag us – your creativity inspires our whole community. Feeling adventurous? Experiment with different yarn colors for a vibrant patchwork pumpkin, or add a unique stem embellishment. For even more cozy crafting inspiration, be sure to explore the rest of our crochet pattern collection!