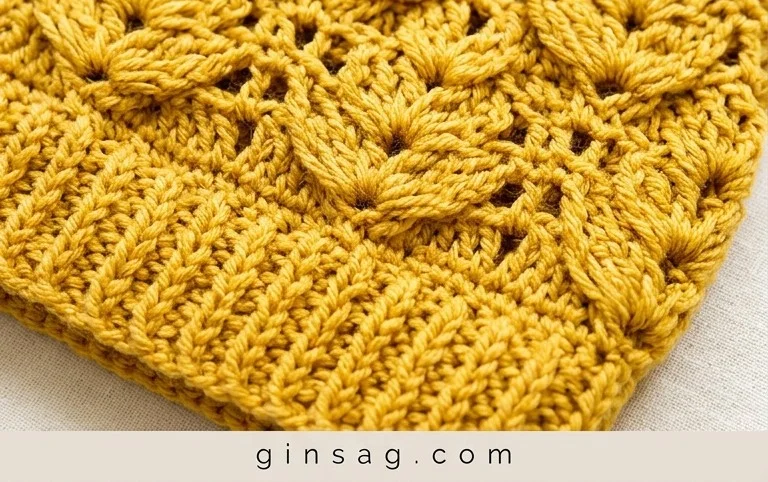
Hello fellow yarn enthusiasts! Get ready to fall in love with your next crochet project. Today, we’re diving into the delightful world of the Crochet 3D Leaf Stitch Beanie Hat! Imagine a cozy, beautifully textured hat with intricate little leaves popping out, adding a touch of whimsical elegance to your headwear collection. It’s like wearing a miniature garden in the best way possible!
This pattern is an absolute dream, whether you’re just dipping your toes into the wonderful craft of crochet or you’re a seasoned pro looking for a fun new stitch to master. The 3D leaf stitch is surprisingly simple to learn, and the result is simply breathtaking. Perfect for whipping up thoughtful, handmade gifts, or even creating a stylish accessory for yourself. We’ll guide you step-by-step with clear instructions and a helpful video tutorial, so you can crochet your way to a gorgeous finished beanie with confidence and joy. Let’s get hooking!

Mastering the 3D Leaf Stitch Beanie: A Free Pattern & Video Tutorial Guide
Are you ready to add a touch of nature’s beauty to your handmade wardrobe? The crochet 3D Leaf Stitch Beanie is a captivating project that combines the elegance of dimensional leaves with the cozy comfort of a winter hat. This pattern, often accompanied by a helpful video tutorial, is a fantastic way to explore a truly unique stitch and create a head-turning accessory. Whether you’re a seasoned crocheter looking for a new challenge or a determined beginner eager to tackle something special, this guide will walk you through everything you need to know to bring this beautiful beanie to life.
Unveiling the Magic: The 3D Leaf Stitch
The star of this beanie is, without a doubt, the 3D Leaf Stitch. This isn’t your average flat stitch! It involves creating raised, textured elements that truly resemble delicate leaves unfurling. Typically, this stitch is achieved by working a series of strategically placed stitches – often a combination of single crochets, half double crochets, and a special “leaf” formation using loops and stitches. The beauty of this stitch lies in its ability to add incredible depth and visual interest without being overly complicated once you understand the technique. The repetition creates a flowing, organic pattern that is both sophisticated and charming.
Gathering Your Supplies: Yarn and Hook Recommendations
Choosing the right yarn and hook is crucial for achieving the desired look and feel of your 3D Leaf Stitch Beanie. For this pattern, a medium-weight yarn (often labeled as Worsted Weight or Aran) is usually recommended. This weight provides a good balance between drape and structure, allowing the 3D leaf stitch to stand out beautifully without making the hat too stiff or too flimsy. Popular yarn choices include:
As for your hook, a size that complements your chosen yarn is key. The pattern will usually specify a recommended hook size, typically in the range of a 5mm (H-8) to 6mm (J-10) crochet hook. Using the recommended size will help you achieve the correct gauge, which is essential for ensuring your beanie fits perfectly. If your gauge is too tight, your hat will be smaller; if it’s too loose, it will be larger. Don’t be afraid to experiment with a hook size up or down if you find your tension differs significantly.
Mastering the Techniques: A Beginner’s Roadmap
While the 3D Leaf Stitch may seem intimidating at first, many patterns are designed with beginners in mind, especially when paired with a video tutorial. Here are some fundamental stitch techniques you’ll likely encounter and tips to help you succeed:
Beginner Tips:
Making It Your Own: Customization Ideas
One of the joys of crochet is the ability to personalize your creations. The 3D Leaf Stitch Beanie offers several avenues for customization:
Color Play:
Size Matters:
This pattern is often available in multiple sizes, from baby to adult. If your pattern doesn’t offer a range, you can usually adjust the size by:
Many patterns will provide guidance on how to adjust for different sizes, so be sure to check the original pattern notes carefully.
Caring for Your Cozy Creation
Once your beautiful 3D Leaf Stitch Beanie is complete, you’ll want to keep it looking its best. The care instructions will largely depend on the yarn you’ve used, but here are some general guidelines:
Beyond the Beanie: Project Ideas Galore
The 3D Leaf Stitch is so versatile, it’s not just for beanies! Once you’ve mastered this hat pattern, consider applying this gorgeous stitch to other projects:
The 3D Leaf Stitch Beanie is more than just a hat; it’s an experience. It’s the satisfaction of learning a new, beautiful stitch, the joy of creating something practical and stylish, and the pride of wearing a piece of art you made with your own two hands. So grab your hook, your favorite yarn, and dive into this delightful pattern – your head (and your crafting soul) will thank you!
I hope you’re as excited about this 3D Leaf Stitch Beanie as I am! This pattern is a fantastic way to add a touch of texture and charm to your headwear collection, and it’s surprisingly achievable. Don’t be shy – grab your hook and yarn and give it a try! I can’t wait to see what beautiful creations you come up with. Share your finished beanies on social media using #3DLeafBeanie or by tagging me – your work is truly inspiring!
Feel free to experiment with different yarn weights, colors, or even add a pom-pom for extra flair. And if you’ve enjoyed this pattern, be sure to explore the rest of my crochet pattern library for more delightful projects!